


-
“I just wanted to say thank you for your excellent products and service over the past 12 years. ”
- Daniel R. - Texas


- ASSEMBLED IN USA
- EASY INSTALLATION
- FREE SHIPPING
- LIFETIME WARRANTY
- LIVE CUSTOMER SUPPORT
-
“I just wanted to say thank you for your excellent products and service over the past 12 years. ”
- Daniel R. - Texas
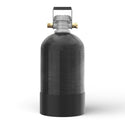
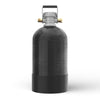
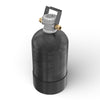
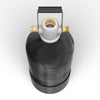
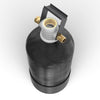
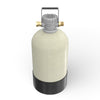
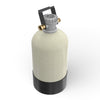
Portable RV Water Softener by SoftPro (Lifetime Warranty)
100% NO-RISK MONEY BACK GUARANTEE
SATISFACTION GUARANTEED!
6 Month Money Back... The Quality Water Treatment Advantage

We are confident that you'll love the water treatment systems that we sell.
If you don't like it, return it for a full refund!
QUICK LINKS
Looking for Something?
- Filter Upgrade Options
- Our In-House Product Review
- What's Included
- Product Specs & Maintenance
SOFTPRO PORTABLE RV WATER SOFTENERS
Performance & Simplicity
- Luxury Soft Water
- Protect Your Plumbing System
- No Water Waste
- Lifetime Warranty
- Optional Sediment/ Sand Separator Filter with Reusable Filters
- *** NOTE: Tank color will be black or almond depending on stock


Built on trust. Delivered with speed.
We ships from multiple locations for fast arrivals and smooth installs. 30+ years helping Americans get the soft, clean water they need. We answer calls too!

RV/ PORTABLE SOFTENER
KEY FEATURES
Lifetime Warranty
Limited lifetime warranty on the tank and valve.
No Water Waste
Does not require drainage.
Electricity-Free
Does not require power to operate.
Maintenance-Free
Just add salt.
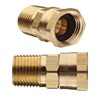
Quick Hose Connections
Included with system.
WATER SOFTENERS
Why SoftPro Portable RV Elite Stands Above The Crowd
Convenient
Portable
Soft Water
No Hassle Maintenance
Easy Use
Practical
Eco-Friendly
0 Gal.
No Water Waste
Eco-Friendly
0 Watts
No Electricity

- Easy to hook-up. Quickly connects in minutes!
- Simple to regenerate - Use regular table salt
- Compact & light weight - Easy to haul!
- Protect your RV from Scale-Up
- No more water spots on your dishes
- Help get rid of dry skin
- Great for washing your car or RV
| Model Capacity | Dimensions | Gallons |
|---|---|---|
| 8,000 | 21.5"h x 6"w | 800 |
| 16,000 | 21.5"h x 10"w | 1680 |
SOFT WATER ADVANTAGES
So Many Benefits with Soft Water


THE PRE-FILTER MUST-HAVE UPGRADE OPTION
Say No to Clogging


This Spin-Down Sediment Filter should be the must-have upgrade option for your portable RV setup.
Don't waste time & money buying replacement filter cartridges.
- Reusable - Cleanable Filter Screens.
- High-Performance, 25 GPM Flow Rates
- Economical - Just wash out the filter screens
- Convenient
Advanced Centrifuge Spin-Down DESIGN
How Spin-Down Sediment Filter works

The sand separator utilizes a replaceable, cleanable polyester screen that filters large sediments.
Occasionally, the sediment will have to be flushed or cleaned out.
Simply open the ball valve (red handle) at the bottom to allow water pressure to flush out sediments.
The clear sump housing allows you to see and properly monitor any trapped sediment.
- In a bucket, mix 1 gallon of water with 1 ounce of bleach.
- Turn water off to the filter.
- Open the bottom ball valve to release pressure off the system.
- Unscrew the filter bowl from the tee, and pull out the O-ring and filter. Place the O-ring aside.
- Dip and swirl the filter screen in the bucket to remove all heavy particles out. If needed, use a soft brush.
- Re-insert the filter and O-ring. Then hand tighten the housing bowl back on to tee.
- Shut off the ball valve, and turn the water on.
WATER Analysis Report
Size Does Matter - Check Your Water & Options
- Get Your Free, Instant Water Report
- Custom Sizing Recommendations
- Get quality recommendations to match your specific needs
ANALYSIS REPORT
UPGRADE OPTIONS
Elevate the Experience

- Spin-Down Sediment/ Sand Separator Inline Filter
- Reverse Osmosis With Advanced Alkalizer Filter
- Travel Berkey Filter
- Berkey Filter Sport Water Bottle
Choose one or more to elevate your experience.
Sediment/ Sand Separator Inline Filter
Protect your plumbing system from unwanted water debris.
This easily screws on with a hose adapter.
CLEANABLE & REUSABLE
Other filters require to purchase their branded filter screen replacements. This is expensive and inconvenient.
- High Flow up to 25 GPM!
- Economical with cleanable filter screens


Reverse Osmosis with Advanced Alkalizer Filter
Get the ultimate drinking water at your home.
Enjoy the health benefits of alkalized, fully filtered bottled-quality water at your kitchen sink.
The 5 Stage, Ultimate Drinking Water Filtration.


Travel Berkey Filter
The perfect travel size for the ultimate drinking water from almost any water source.
- Filter 99.99%+ of viruses, bacteria, pathogens and organisms.
- No electricity.
- High-Efficiency
- Up to 6,000 gallons of filtered water.
- Cleanable filters


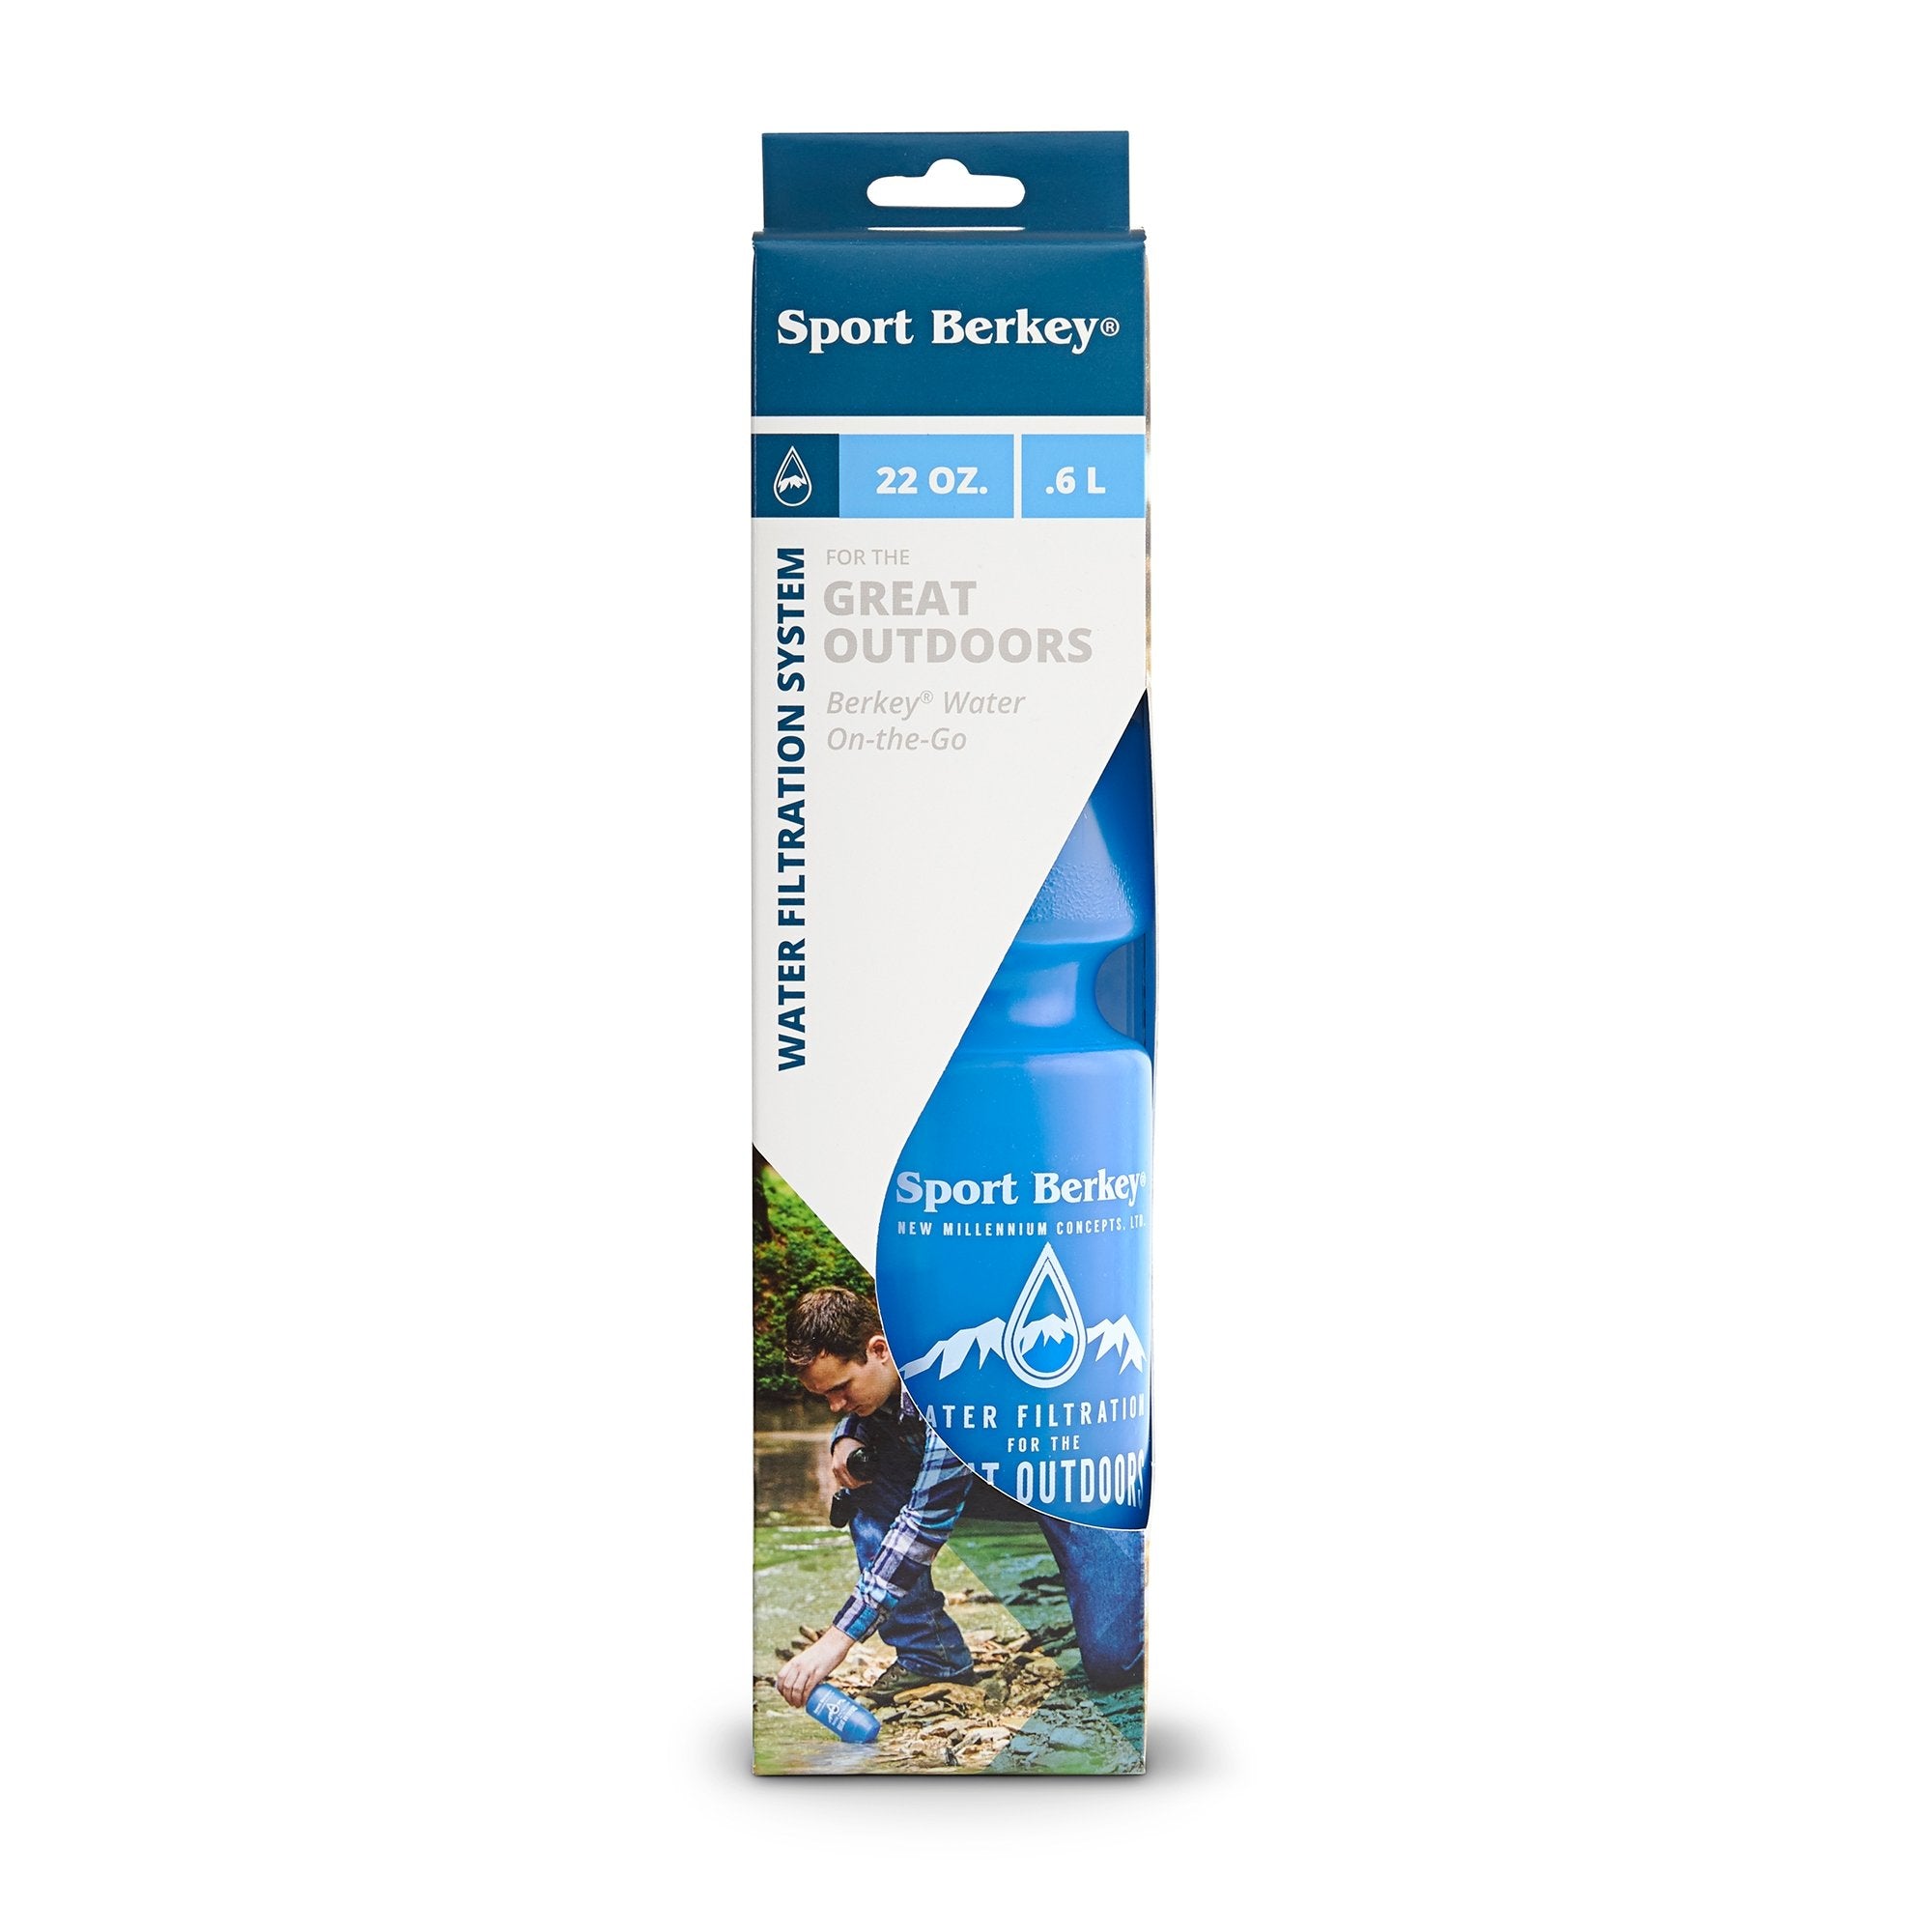
Berkey Filter Sport Water Bottle
Get purified water on the trail or on the road.
The easy use sport bottle uses the same Black Berkey filter elements as in their flagship products.
Fill it up and go.
Filter 99.99%+ of viruses, bacteria, pathogens and organisms.
FROM THE LAB...
Dive into Our In-House Review
SoftPro High-Efficiency Salt-Free Conditioner

The quick & dirty summary below...
FULL IN-DEPTH REVIEW
Read Our Full SoftPro RV - Portable Water Softener Review:
SoftPro has created the perfect product to ensure you don’t have to suffer from hard water anymore. Traveling in an RV means you have to use whatever water is available. Sometimes you get clean, quality water, and sometimes you’re not so lucky. You may get unbearably hard water that leaves stains and spots on surfaces and can leave you with dry, itchy skin.
To combat this gamble, use a water softener. You’ll consistently have water you’re comfortable using to wash your clothes, clean your car, take a shower, and even make a pot of coffee with!
The SoftPro Portable RV Water Softener has several features that have drawn us towards it. First off, the tanks have three sizes to choose from — 8,000 and 16,000 grain capacities.
The tank itself is well-built, stable, and easy to transport. The tank begins to shine when it is in use. The softness of the water is instantly noticeable.
Whenever needed, everyday table salt can be used to keep that softened water coming through. Many past purchasers have also noted their model has lasted far longer than expected before needing regeneration.
- Competitive pricing
- Ease of use
- True softened water
- Long-lasting product
In all sincerity, there isn’t much to gripe about. Sure, we could say that maybe SoftPro isn't as well known as other manufacturers.
But considering how great it works – and that the portability is even better than competing products, then it’s tough to complain.
The Soft Pro Water Softener is best for RV owners who want a portable water softener that saves time and money. Compared to competitors, this model is easy to set up, efficient, and reliable for everyday use.
The largest size is 16,000 grains, which is typically ideal for 2-3 full-time (or part-time) RVers.
This water softener is ideal for anyone who needs softened water in their RV or motorhome. Everyday life necessitates the frequent use of water. Whether you’re flushing the toilet, cleaning your dishes, or washing the outside of your RV, you’re using water.
When you’re using hard, mineral-rich water, you’re setting yourself up for dirty dishes, stains, scale build up, gross deposits and spots on surfaces the water has touched. Furthermore, when you shower with water like that, your skin suffers. You’re left with rough, dry skin.
Using the Portable RV Water Softener, you don’t have to worry about all that. No more dishes with spots on them. Your RV will look spotless after cleaning it. Your water will smell clean, feel clean, and leave all your goods clean!
If you’re looking for a quality water softener that is going to last long and give you water you can feel comfortable using, this is your go-to model.
.
You get a well-built tank, solid features, a lifetime warranty on the tank, and the valve. What’s not to like?
BRAND COMPARISON
How Does SoftPro Portable RV Softener Compare With Others?
Portable water softeners immensely practical for your water and plumbing system... while adding some luxury to your travelling experience.
Check out our updated 2020 RV/ Portable Water Softener Comparison Report:

FULL IN-DEPTH REVIEW
Read Our Full SoftPro RV - Portable Water Softener Review:
To start, SoftPro is built in the US, has free shipping, and a lifetime warranty. Compared to other, similar water softeners, the lifetime warranty is extremely enticing. Furthermore, the product comes with live customer support.
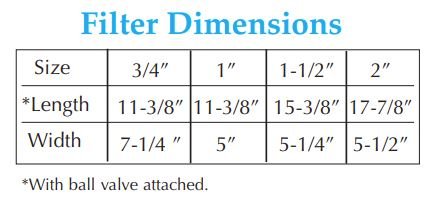
This water softener ranges from 21.5 inches high by 6 inches wide to 33.5 inches tall by 8 inches wide, depending on the model. The tank weighs anywhere from 26 pounds to 54 pounds. All the models are a good size and not too heavy that would put potential clients off.
The design is sleek and appealing. On the top portion of the tank, two threads, male and female, come off either side. At the very top, there is a handle allowing you to easily pick up the tank and move it.
The SoftPro portable water softener is perfect for anyone who owns an RV or a camper. As it’s a portable tank, it can be hooked up to any water source.
- The PWS-8 Model:
This 8,000-grain model is ideal for one person who uses their RV part-time. If you’re one individual who lives in the RV, you may want to consider a size up. - The PWS-16:
The mid-size model comes with 16,000-grain and is perfect for two people who share the RV space. Alternatively, one individual who lives in their RV could greatly benefit from this size.
If you’re one person living in your RV, you can still get by just fine with the 8,000-grain model. You just may need to add salt more frequently than someone who uses it part-time.
As the SoftPro water softener can use normal table salt, adding salt more often is not an issue!
Plus, the regeneration process is a breeze.
Cleaning your dishes, your RV, your clothes, and showering with softened water are obvious benefits. However, this portable water softener also protects your plumbing.
If you let hard water run through your pipes, minerals may scale, or build-up, over time. This can significantly reduce the lifetime of such parts.
Thus, using the SoftPro water softener saves more than just your skin and dishes—it saves your RV’s pipes and appliances!
Although the SoftPro portable water softener offers soft, great-tasting water consistently, it does include the option of adding accessories for further water-filtering benefits. Clients can purchase an Inline T Sand Separator. Why purchase this, you may ask.
The bottom line is that this accessory keeps small particles out of your water softener, thus protecting your RV. The T Sand Separator is a high-impact, non-corrosive filter that uses a reusable polyester screen.
Whenever it gets dirty, you clean it off. No need to spend more money on a new filter because it’s reusable! Some clients have reported using it for over 3 years with consistent results.
All you need to do is remove the filter and clean it with water and a brush. Place it back in the water softener, and you’re good to go!
EASY INSTALLATION
Plumbers, Handymen, and Weekend Warriors
Simple. Quick. Seamless.
Installing this water softener is as easy as it gets. Once you know where you want to keep it placed, use two adapters, one female and one male, to get it ready to go.
One past purchaser even commented, “IT TOOK LONGER TO GET OUT OF THE BOX THAN TO INSTALL IT LOVE IT”.
It’s safe to say, past purchasers have loved how easy this product is to use.
If you’re going for significant lengths of time between uses, you don’t need to drain the water for storage. Nor will you need to dump the water when you come back. All you have to do is regenerate the water before you use it.
To regenerate your water softener, just add salt! You don’t need to use a special type of salt either—you can use table salt or whatever you happen to have. For the 8,000-grain model, all you need is a cup of salt.
To regenerate the water softener, open the top of the tank and pour in the cup of salt!
Seal it up and let the water run through it. When running water through, only let a bit go through at a time, just a trickle of water. Continually check the water by tasting to see if it is clean and salt-free. Users have reported this process can take anywhere between a minute and 90 seconds.
If you have the 16,000-grain model, you’ll need to double up on the salt. Use 2 cups of water. This process may take a bit longer than the 8,000-grain tank as it’s a larger size.
For the 21,000-grain tank, you’ll have to use 3 cups or just under 3 cups. The same process as before—let the water trickle through. Taste it and when it’s salt-free you’re good to go.
UPGRADE OPTIONS REVIEW
Reusable Sediment Filter & Drinking Water Filters

REUSABLE - WASHABLE FILTER
Sand Separator Filter, Inline "T" Profile, 20 GPM, 60 Mesh
Filtering sand and sediment out from your plumbing is crucial to the proper operation of your water system.
Most other portable RV water softener filters require purchasing a new filter. At up to $40+ for a replacement filter screen, this add up to the cost. Then you also need to factor in the the time and effort to order and receive replacement filters.
This inline sand separator filter is built for practicality nad value. An easy no-brainer to purchase.
Customer rave about the savings and convenience.


The really unique thing about our R/O filtration is the addition of the alkalizing filter. Standard RO systems will lower your water’s PH to 6 or 6.0, making it acidic. You may be aware that our bodies don’t do well on acidic water as there have been lots of studies done on Reverse Osmosis (RO) Drinking Water Filters on this subject. This is why it’s important to alkalize your RO water so you’re getting pure, clean, delicious, AND totally healthy water...
Our RO system can handle 75 gallons per day of drinking water, which is more than plenty. It’s a high-efficiency system also. Most RO filters waste 3-5 gallons of water for every 1 gallon of filtered water. But our RO system is a 1 to 1 ratio, making it much more efficient.
ULTIMATE COUNTERTOP DRINKING WATER
Take It Everywhere


Berkey Water filters are incredibly popular. Elegant filtration that just plain works. We like it because you get ultimate, purified water from almost any water source... and it looks great.
- Filter 99.999% of Viruses
- Filter 99.9999% of Pathogenic Bacteria
- Filter Lasts Up To 6,000 Gallons
- Quality & Value


For that hike or ride on the trail, take the Berkey Sport Bottle. You can use an assortment of water sources like lakes and streams.
When it comes to portable water filtration, Berkey is among the best and most popular.
- 22 oz Capacity
- 160 Refills of Raw/ Untreated Water
- 640 Refills of Municipal Tap Water
EASY INSTALLATION
SoftPro Saltless Water Softener Alternative Review Conclusion
No more hard water. No more dry skin. No more dirty dishes. You get the picture. The SoftPro water softener produces what we call silky water. Using an 8% premium resin, the product is unparalleled.
Once you’ve got your own SoftPro up and running, it’ll take no time to realize how good this water softener truly is. You won’t believe you’ve let yourself use hard water for as long as you had. Nor will you be able to fathom going back to using hard water.
Use the SoftPro water softener once, and you’re hooked for life.
Since the SoftPro Portable Water Softener is priced similarly, if not cheaper, than other models for RVs, it makes the purchase a no-brainer.
The water softener has excellent features, a long life, and a durable build. It’s easy to store, easy to set-up, and easy to regenerate.
Plus, you can use table salt, making the overall life even cheaper! Lastly, clients get a lifetime warranty and live customer support.
SOLUTION KITS
What's Included?
- Portable softener tank
- Cap with handles
- Two (2) hose quick connections
- Clear sump with ball valve
- 3/4" Inline Tee
- 1/2" MIPT drain cleanout with cap
- 60 Mesh filter screens - Reusable/ cleanable
- SoftPro Reverse Osmosis Filter System with Filter Housing
- Sediment Filter - 5 Micron Sediment Filter
- 2 x Carbon Block Filters - 10 Micron Carbon Block, Coconut Shell Granular Activated Carbon
- High-Efficiency, Reverse Osmosis Membrane (75 GPD)
- Advanced Alkalizing Filter
- Faucet (Modern, chrome faucet shipped by default)
- Drain Saddle
- Brass Swivel Adapter
- Installation Kit/ Tubing
Note: Ice Maker connection kit is an optional upgrade.
- High Polish Stainless Steel Chambers (Upper and lower)
- 2 Black Berkey Filter Elements
- Spigot
- 22 oz Bottle and Top
- Sport bottle Black Berkey Filter Element
SPECIFICATIONS
The Nitty Gritty...
| Model Capacity | Dimensions | Gallons |
|---|---|---|
| 8,000 | 21.5"h x 6"w | 800 |
| 16,000 | 21.5"h x 10"w | 1680 |
- Clear sump
- 3/4" Inline Tee
- 1/2" MIPT drain cleanout with cap
- 50 Gallons Maximum Capacity
- High-Efficient 1:1 Purified Water to Waste Production
- Premium 5 Stage Filter System
- Advanced Alkalizing Filter to Eliminate Acidic Water
- Manufactured in USA

Berkey Sport Bottle:
11.2" Tall
2.6" Diameter
MAINTENANCE, REPLACEMENT & WARRANTY
Easy Operation
No regular maintenance other than adding salt or cleaning sediment/ sand filter screen filters (if purchased) is required.
Regular table salt is all that is required.
Step 1: Turn off the water supply.
Step 2: Disconnect the outlet hose from the outlet side of the softener.
Step 3: You can drain water by tilting the unit over or turning it upside down with the head/cap ON.
Step 4: Remove the top plug.
Step 5: Add the correct amount of salt into the top of your softener.
One full 26 oz. box of iodized or non-iodized salt for Part-Time Softener Model.
Two full 26 oz. boxes of iodized or non-iodized salt for the Full-time Softener Model.
A few Ways to add Salt:
1 ) Pour salt into the softener. - Mix salt with warm water and pour the solution into the softener.
2 ) Pour salt into the softener while periodically pouring water slowly over it with a cup.
Step 6: Replace cap and turn the water on and rinse VERY SLOW out the softener water hose that was connected to your RV and let run on ground for the directed amount of time.
Note: Stream of water should just clean the side of the tank/the stream should be the size of a pencil. - Rinse for 12-15 minutes for the Part-Time Model. - Rinse for 24-30 minutes for the Full-Time Model.
Step 7: Increase water flow to fast-rinse. - Rinse for 3-4 minutes for the Part-Time Model. - Rinse for 6-8 minutes for the Full - Time Model.
Step 8: To verify the regeneration process is complete use hardness test strips to ensure the water at the OUTPUT of the softener is soft. Soft water is 0-3 GPG. At the end of the regeneration process, the water should also not have a salty taste.
Step 9: The regeneration cycle is complete.
Step 10: Reconnect soft water hose to your RV.
Simple cleaning is needed when sediment is visible on the filter screens.
- In a bucket, mix 1 gallon of water with 1 ounce of bleach.
- Turn water off to the filter.
- Open the bottom ball valve to release pressure off the system.
- Unscrew the filter bowl from the tee, and pull out the O-ring and filter. Place the O-ring aside.
- Dip and swirl the filter screen in the bucket to remove all heavy particles out. If needed, use a soft brush.
- Re-insert the filter and O-ring. Then hand tighten the housing bowl back on to tee.
- Shut off the ball valve, and turn the water on.
Filter Replacement:
Bottom three (Sediment and Carbon Filters) - 6 to 12 months
Alkalizing Filter - 1 to 2 years depending on use
RO membrane - 2 to 3 years depending on use
Water quality will affect longevity.
As part of a regular maintenance routine, cleaning the Berkey filter elements is recommended.
When cleaning Berkey filter elements, use the cleanest, clearest water source.
When the flow rate decreases and the output slows to the point that it is no longer meeting your needs, clean the filter elements.
Typically, cleaning schedule:
Household use: every six months
Field use: Every week, possibly every daily in harsh conditions.
CAUTION:
Do not allow contaminated water to enter the core of the Berkey filtering element. This can be prevented by placing your finger over the hole where the water exits the filter.
Our systems can easily be installed by a local plumber or handyman or by our DIY customers.
For installation guides and videos, please click here: Install Videos & Guides
SoftPro Authorized Dealer
WHY BUY FROM US
Real Experts. Real Value.

Providing the Best in Class
Water Treatment for Over 30 Years
Our mission is to empower people to live healthier, happier lives by providing quality water solutions for their families and businesses.
Quality Water Treatment has been delivering best-in-class water treatment solutions and customer service to people and businesses across North America since 1990.
We've done it all and seen it all!
As a family-owned business, our priority is our customers’ satisfaction. Reliable, economical water treatment can enhance quality of life in several ways:
- Improve taste
- Eliminate toxins
- Extend the life of appliances, pipes and fixtures
- Gentler on clothes, hair and skin
- Prevent costly plumbing corrosion and stains
We carry the best brands in the industry in value-added packages, making installation and operation of your water treatment system simple and efficient.
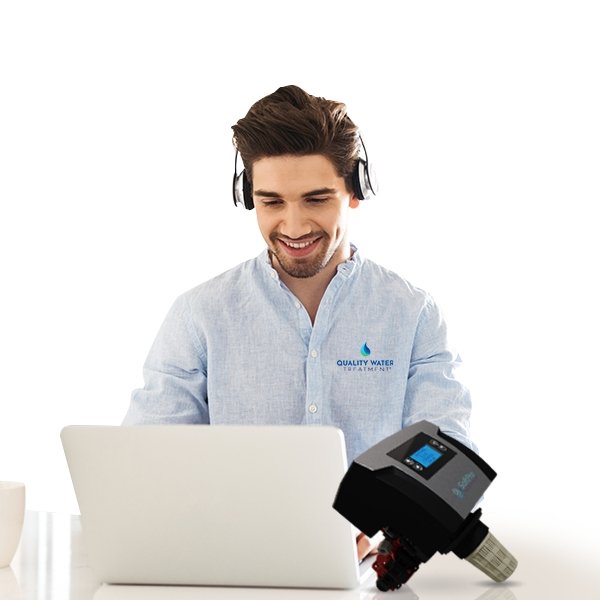
Intelligent Assessment

Everyone’s water treatment needs are different. With our innovative assessment technology, you can take the guesswork out of your water treatment options.
Leverage our Water Intelligence Engine™ to get the best expert recommendations for your unique water-quality needs. We’ll also help you discover what's really in your local drinking water and how the top brands stack up.
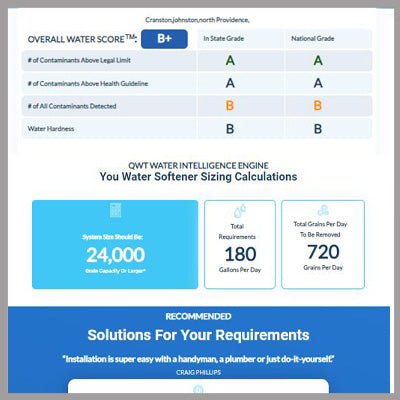
The Water Intelligence Engine™ will:
- Help you confidently and properly size a water softener solution to meet your space’s specific needs.
- Provide expert recommendations of various water treatment solutions.
- Thoroughly educate you on your options.
- Our newly updated Comparison Chart below compares all major brands.
- Our Water Score Report grades your local water quality and details any water contaminant findings.
Real Experts You Can Count On
At Quality Water Treatment, we treat our customers like family. And we know the products inside and out.
Don't waste your time wandering around your local big box store trying to find someone to help you.
You'll only find a pushy associate with limited knowledge, simply trying to move product from a limited inventory. Your odds of finding exactly what you need or finding a true expert are pretty low – generic water softeners and water filters at these stores often just don’t cut it.
Shop with confidence at Quality Water Treatment, and we’ll help you get the correct equipment for your specific needs and have it delivered right to your door!

Friendly, Expert Help at Your Fingertips

After over 30 years in business, we know water treatment like no one else! And we want you to leverage our expertise to get the best solutions for your needs and goals.
Our team of highly trained water treatment consultants is here to answer all of your questions.
We compare all major brands and show you all your options with no pushy sales tactics.
Everything you need to make the right decision is at your fingertips. You can also connect with us via live chat, text, phone and email.
Delivered to Your Door with Ease
All orders are processed within just 1 day.
With streamlined processes throughout our organization, we rapidly fulfill orders right after they're placed and ship them to your door – FAST!
No waiting. No hassle. We are 100% transparent about the status of your order at each step of the process.
You'll get automatic email alerts and you can check your order status at any time.

"Hands down, SoftPro Elite beats ALL the water softener competitors across the board in terms of next-generation technology, efficiency, warranty, value, and affordability.”
Affordable Ways to Pay

You deserve quality, clean, soft water, starting now!
We make purchasing the complete solution even easier with our flexible financing options.
Take advantage of QuadPay and make 4 easy interest-free payments over time. Or, pay a very small amount each month with Affirm.
We make buying simple and easy.
PRODUCT & TECHNICAL SUPPORT
Real Experts That You Can Count On
Steer clear of the guessing game.
You are investing your hard earned money into a solution to provide quality water for your family.
We cut through the clutter for you to make the right decisions.
Unlike the big box stores…
Our team of experts recommend the best solutions that’s available in the entire marketplace.
Our water treatment consultants help you before AND after your purchase.
Our customers are like family.
Here's What Our Customers Are Saying...
-

“I just wanted to say thank you for your excellent products and service over the past 12 years. ” - Daniel R. - Texas
-

“After we installed the Softpro Elite I noticed a significant difference in the house water quality. ” - Julie M. - Florida
-

“I decided to go with the Softpro water softener over Fleck. Very impressed and satisfied with their products and customer service! ” - Roy P. - California


